W-raises Hold Feet On Ground Tutorial
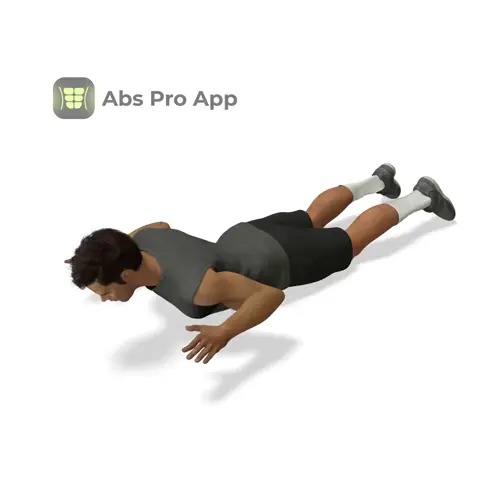
The W-raises hold with feet on the ground is a bodyweight isometric exercise performed lying face down. You lift your chest slightly and hold your arms out to the sides, forming a T or W-like shape. It mainly targets the upper back and shoulders while gently engaging your core to keep your body stable.
This exercise is great for beginners who want to improve posture, shoulder control, and upper-back endurance. Focus on slow control, squeezing the shoulder blades, and keeping the neck relaxed. It works well as part of a warm-up, posture routine, or low-impact strength workout.
Benefits
- Improves posture awareness
- Strengthens upper back muscles
- Builds shoulder stability
- Encourages core engagement
- Low impact and joint friendly
- Helps counter slouched sitting
Setup & Starting Position
Lie face down on the floor on a comfortable surface like a mat. Extend your legs straight behind you with your feet resting on the ground. Your forehead can lightly touch the floor at first, and your neck should stay long and relaxed.
Extend your arms out to the sides at shoulder height, palms facing down or slightly forward. Your body should form a straight line from head to heels, with your hips and legs relaxed but grounded.
Before starting the hold, gently tighten your core by drawing your ribs down and lightly bracing your stomach. This helps protect your lower back when you lift your chest.
Setup tip: Think about lengthening your spine forward rather than lifting as high as possible.
How To Do W-raises hold feet on ground (Step-by-step)
- Lie face down with legs straight and feet on the floor.
- Extend arms out to the sides at shoulder height.
- Engage your core gently and keep neck neutral.
- Lift your chest slightly off the ground.
- Raise arms to form a T or W shape.
- Squeeze shoulder blades together.
- Hold this position for the set time.
- Breathe steadily and stay relaxed.
- Lower chest and arms back down with control.
Form Cues
- Neck long and relaxed
- Chest lifts, not lower back
- Squeeze shoulder blades gently
- Arms stay level with shoulders
- Feet stay on the floor
Breathing & Bracing
Before lifting, take a calm breath in through your nose. As you lift your chest and arms, gently brace your core as if tightening a wide belt around your waist. This is not a hard squeeze, just enough to feel stable.
Breathe normally during the hold. A simple rhythm is to inhale for about three seconds and exhale for about three seconds. Avoid holding your breath, as this can cause unnecessary tension in your neck and shoulders.
Keep your ribs down and hips relaxed against the floor. If you feel your lower back taking over, reduce the lift height and focus more on breathing calmly while holding the position.
Common Mistakes
- Lifting too high, fix by lowering chest slightly.
- Shrugging shoulders, fix by relaxing neck and traps.
- Holding breath, fix by slow steady breathing.
- Bending elbows too much, fix by extending arms evenly.
- Neck craning up, fix by looking down at the floor.
How It Should Feel
Good signs:
- Gentle burn in upper back muscles
- Shoulders feel stable, not strained
- Core lightly engaged
Warning signs:
- Sharp pain in shoulders or spine, stop immediately
- Pinching in lower back
If you feel it mostly in your neck, lower your chest and focus on squeezing your shoulder blades down and back. If your lower back feels uncomfortable, reduce the lift and tighten your core slightly more while keeping feet on the floor.
Alternative Names
Prone T hold, Prone W raise hold
Variations
Easier
- Arms Lowered Hold: Keep hands slightly closer to the floor to reduce tension.
- Short Hold: Hold for 5 to 10 seconds at a time.
Harder
- Longer Hold: Increase hold time while maintaining perfect form.
- Lift-Off Pulses: Add tiny controlled pulses during the hold.
Sample Workout
- W-raises hold feet on ground, 3 sets of 15 to 30 seconds
- Bodyweight squats, 3 sets of 12 reps
- Knee push-ups, 3 sets of 8 to 10 reps
- Dead bug, 3 sets of 6 reps per side
Use the W-raises hold early in the workout to activate posture muscles.
Progression Plan
Week 1: Perform 3 sets of 10 to 15 second holds. Focus on learning the correct setup, breathing calmly, and keeping the neck relaxed. Rest about 30 to 45 seconds between sets.
Week 2: Increase hold time to 20 to 30 seconds per set. Keep the same number of sets, but aim for better control and stronger shoulder blade squeeze.
Week 3: Add a fourth set or slow down your breathing to maintain tension longer. If you can hold for 30 seconds without losing form, try adding small lift-off pulses.
If form breaks or you feel discomfort, repeat the previous week until it feels strong and controlled.
FAQ
Most beginners start with 10 to 20 seconds and build up gradually.
Should my feet lift off the ground?No, in this variation the feet stay on the floor the entire time.
Is this safe for shoulder issues?It is usually gentle, but reduce range and stop if you feel pain.
Can I do this every day?Yes, light holds can be done daily as posture work.
Summary
The W-raises hold with feet on the ground is a simple yet effective way to build upper-back strength and improve posture. By focusing on control, breathing, and shoulder blade engagement, you can get strong benefits without heavy load.
Use it regularly as part of your warm-up or strength routine, progress slowly, and prioritize quality over duration. Small improvements in control can make a big difference over time.
Get Defined Abs in 30 Days
This exercise is part of our complete 30-day ab program. Download the app for structured daily workouts and track your progress.