Side Seated Tucks Tutorial
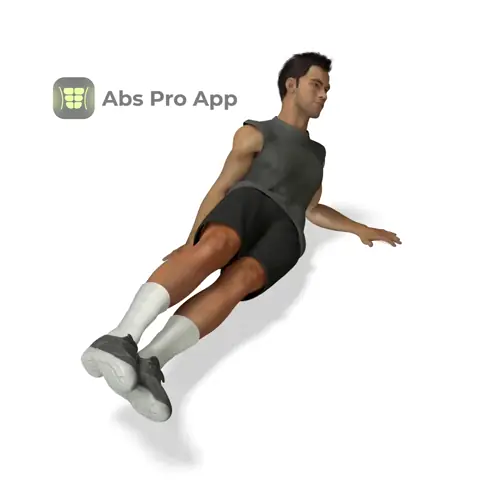
Side seated tucks are a bodyweight abs exercise performed while sitting on one hip with the lower forearm lightly supporting you on the floor. You tuck your knees in toward your chest, then extend the legs straight out at a diagonal angle. This move targets the obliques while also challenging balance and core control.
It is a beginner-friendly exercise that works well in home workouts, warm-ups, or core finishers. Focus on slow, controlled movement, steady breathing, and keeping tension in your abs instead of relying on momentum.
Benefits
- Strengthens the side abs without equipment
- Improves core control and coordination
- Builds awareness of hip and trunk position
- Low impact and joint friendly
- Easy to add into circuits or short workouts
- Helps prepare the core for harder side plank work
Setup & Starting Position
Sit on the floor resting on one hip, with your torso angled slightly toward the ceiling. Place your lower forearm on the floor beside your hip, elbow under your shoulder, using it lightly for balance rather than pushing hard.
Bend both knees and keep your feet together. Lean back just enough so your abs engage and your feet can lift off the floor. Your upper arm can rest across your body or lightly touch the floor for balance.
Keep your chest open, shoulders relaxed, and spine long. Before starting, gently tighten your abs as if preparing for a small cough.
Setup tip: If you feel pressure in your shoulder, move your elbow slightly farther away from your body and reduce how much weight you put through the forearm.
How To Do Side seated tucks (Step-by-step)
- Start seated on one hip with knees bent and feet lifted.
- Support yourself lightly on your lower forearm.
- Lean back slightly while keeping your chest lifted.
- Tuck both knees in toward your chest under control.
- Pause briefly as your abs fully tighten.
- Extend both legs straight out at a diagonal angle.
- Keep feet together and toes relaxed.
- Move slowly without swinging.
- Return to the tucked position to complete one rep.
- Finish all reps on one side before switching sides.
Form Cues
- Stay tall through the chest
- Move slow and controlled
- Feet together, legs straight on extension
- Light forearm support only
- Abs lead the movement
Breathing & Bracing
Start each set by taking a calm breath in through your nose. As you tuck your knees in, gently exhale through your mouth and tighten your abs as if pulling your belly button slightly inward.
Inhale again as you extend your legs out, keeping the ribs down and hips steady. Avoid holding your breath or forcing a hard brace.
A simple rhythm is exhale on the tuck, inhale on the extension. Your core should feel active but not rigid. If breathing becomes rushed, slow the movement and reduce the range slightly until you regain control.
Common Mistakes
- Swinging the legs for momentum, fix by slowing down and shortening the range.
- Leaning heavily into the forearm, fix by engaging the abs more.
- Bending the arms or collapsing the shoulder, fix by stacking elbow under shoulder.
- Arching the lower back, fix by leaning back less.
- Rushing reps, fix by counting a steady tempo.
How It Should Feel
Quick Self-Check:
Good signs: You feel steady tension along the side of your abs, your movement stays smooth and controlled, and your hips remain mostly still. Breathing feels manageable and your neck stays relaxed.
Warning signs: Sharp pain in the shoulder, hip, or lower back, strong pulling in the neck, or loss of balance. Stop immediately if you feel sharp pain.
If you feel it mainly in the neck or shoulders, reduce how much weight you put through the forearm and slow the movement. If the lower back takes over, shorten the leg extension and lean back less until core control improves.
Alternative Names
side seated knee tucks, side tuck crunch
Variations
Easier
- Bent-leg side tucks: Keep knees more bent during the extension to reduce leverage.
- Toe-tap side tucks: Lightly tap heels to the floor on each extension.
Harder
- Straight-leg slow side tucks: Fully straighten legs and extend for a longer count.
- Side seated tuck hold: Pause for 2 to 3 seconds in the extended position.
Sample Workout
Beginner Core Circuit:
- Side seated tucks, 8 to 12 reps per side
- Dead bug, 10 reps total
- Glute bridge, 12 reps
- Rest 45 seconds
Repeat the circuit 2 to 3 rounds. Focus on clean reps and steady breathing rather than speed.
Progression Plan
Week 1: Perform 2 to 3 sets of 8 to 10 reps per side. Keep knees slightly bent and focus on smooth control. Rest 45 to 60 seconds between sets.
Week 2: Increase to 10 to 14 reps per side. Begin straightening the legs more on each extension while keeping form solid. Slightly slow the tempo.
Week 3: Add a 1 to 2 second pause in the extended position or reduce rest to 30 seconds. Only progress if you can maintain balance and breathing.
If form breaks down, repeat the current week. Move to advanced variations once you can complete all reps with steady control and no joint discomfort.
FAQ
How many reps should I do per side?
Start with 8 to 12 controlled reps on one side before switching. One rep includes a tuck and full extension.
Should my feet touch the floor?
No, keep them lifted if possible. Touching down is fine for beginners who need balance.
Is this better than regular seated tucks?
It targets the obliques more because of the side position.
Can I do this every day?
Yes, if volume is low and you recover well, but rest if soreness builds up.
Summary
Side seated tucks are a simple but effective way to train the obliques using only your bodyweight. By working one side at a time, they build awareness, balance, and core control that carry over into many other exercises.
Keep the movement slow, breathe steadily, and let your abs do the work. Whether you use them as a warm-up, finisher, or core-focused session, consistent practice will lead to stronger and more stable side abs.
Get Defined Abs in 30 Days
This exercise is part of our complete 30-day ab program. Download the app for structured daily workouts and track your progress.