Reverse Low Plank Tutorial
The reverse low plank is a bodyweight core and posterior chain exercise performed facing upward on your forearms with straight legs and lifted hips. It challenges your abs, glutes, and shoulders while also opening the chest and improving posture.
This exercise is best for intermediate trainees who already have basic plank strength and want to build better core control from a different angle. Focus on full-body tension, steady breathing, and keeping your body in one straight line.
Benefits
- Builds deep core strength without equipment
- Strengthens glutes and posterior chain
- Improves shoulder and arm stability
- Encourages better posture and hip extension
- Balances front and back core training
- Low impact on joints
- Enhances full-body tension awareness
Setup & Starting Position
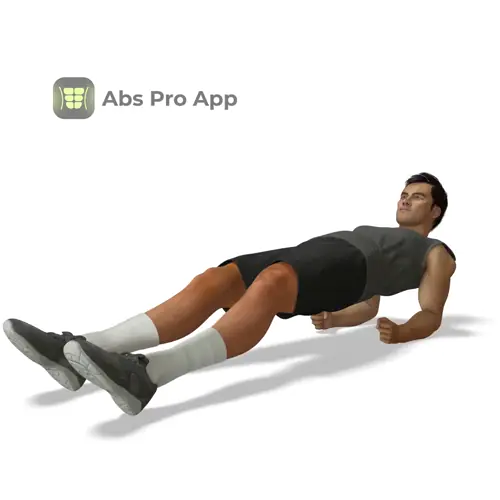
Start by sitting on the floor with your legs extended straight in front of you and your heels resting on the ground. Place your forearms on the floor behind you with your elbows directly under your shoulders. Your palms can face down or slightly inward, whichever feels more natural.
Lean back onto your forearms and set your shoulders by gently pulling them down and back, away from your ears. Your chest should feel open, not collapsed. Keep your legs straight and close together, toes pointing up.
Before lifting your hips, lightly brace your core by tightening your abs and glutes. Press your forearms firmly into the floor to create tension through your upper body.
Quick setup tip: Think about pushing the floor away with your elbows before you lift your hips.
How To Do Reverse low plank (Step-by-step)
- Sit tall with legs straight and forearms placed behind you.
- Align elbows directly under your shoulders.
- Brace your abs and squeeze your glutes.
- Press forearms and heels into the floor.
- Lift your hips until your body forms a straight line.
- Keep your neck neutral and eyes facing upward.
- Breathe steadily while holding the position.
- Maintain tension through abs and glutes.
- Hold for the planned time.
- Lower hips under control to finish the set.
Form Cues
- Elbows under shoulders
- Squeeze glutes hard
- Ribs down, abs tight
- Body in one straight line
- Neck long and relaxed
- Push the floor away
Breathing & Bracing
Proper breathing makes the reverse low plank more stable and comfortable to hold. Before lifting your hips, take a calm inhale through your nose and gently brace your core, as if tightening a wide belt around your waist.
Once you are in position, breathe slowly and rhythmically. A simple pattern is to inhale for about three seconds and exhale for about three seconds. Keep breathing throughout the hold, do not hold your breath.
As you exhale, lightly tighten your abs and glutes again to maintain hip position. Your ribs should stay down, not flaring upward, and your hips should not sag.
If you feel yourself losing tension, reset your breathing, press your forearms harder into the floor, and re-engage your core.
Common Mistakes
- Letting hips sag, fix by squeezing glutes harder.
- Elbows too far from shoulders, fix by realigning before lifting.
- Neck strain from looking around, fix by keeping a neutral head.
- Holding breath, fix by using slow steady breaths.
- Overarching the lower back, fix by pulling ribs down.
- Bent knees, fix by fully straightening the legs.
How It Should Feel
Quick self-check: During a proper reverse low plank, you should feel steady tension across your abs, glutes, and shoulders.
Good signs:
- Strong abdominal engagement without cramping
- Glutes working to keep hips lifted
- Shoulders feel active but stable
Warning signs:
- Sharp pain in shoulders or lower back, stop immediately
- Pinching in the neck
If you feel it mostly in your neck, relax your head and focus on pushing through your forearms. If your lower back feels strained, lower your hips slightly, re-brace your abs, and squeeze your glutes before lifting again.
Alternative Names
reverse forearm plank, supine forearm plank
Variations
Easier
- Bent-Knee Reverse Low Plank: Keep knees bent and feet flat to reduce load.
- Short-Hold Reverse Low Plank: Hold for 10 to 20 seconds with perfect form.
Harder
- Single-Leg Reverse Low Plank: Lift one leg while keeping hips level.
- Reverse Low Plank with Pauses: Add 2 to 3 second pauses at the top.
Sample Workout
Core and Posterior Chain Session
- Reverse Low Plank, 3 sets of 20 to 40 seconds
- Glute Bridge, 3 sets of 12 reps
- Dead Bug, 3 sets of 8 reps per side
- Side Plank, 2 sets of 20 seconds per side
Rest 45 to 75 seconds between sets. Focus on quality holds rather than long shaky times.
Progression Plan
Week 1: Practice holding the reverse low plank for 3 sets of 15 to 25 seconds. Focus on clean setup, elbows under shoulders, and steady breathing. Rest about 60 seconds between sets.
Week 2: Increase hold time to 25 to 40 seconds per set. Aim to keep hips perfectly level and maintain full-body tension.
Week 3: Add difficulty by slowing your breathing and adding brief 2 second pauses at the top while maintaining tension.
Week 4: Progress to a single-leg reverse low plank for short holds of 10 to 20 seconds per side. A full rep here means completing both sides.
If form breaks or lower back strain appears, repeat the previous week until control improves.
FAQ
Can I place my hands instead of forearms?
This would change the exercise to a high reverse plank. For this version, stay on your forearms.
Should my feet be together or apart?
Feet together increases core demand, slightly apart is acceptable if you need more balance.
Is this safe for lower back issues?
It can be if done with proper bracing, but stop if you feel pain and consult a professional.
How long should I hold it?
Most people benefit from 20 to 45 second holds with good form.
Summary
The reverse low plank is a powerful way to strengthen your core and posterior chain using only your bodyweight. By focusing on forearm support, straight legs, and controlled hip lift, you build strength that transfers to better posture and overall stability.
Keep your reps clean, breathe steadily, and progress slowly. With consistent practice, this exercise can become a reliable part of your core training routine.
Get Defined Abs in 30 Days
This exercise is part of our complete 30-day ab program. Download the app for structured daily workouts and track your progress.