Reverse Crunch With Hip Lift Tutorial
The reverse crunch with hip lift is a bodyweight abs exercise that focuses on the lower portion of your core while also training deep stability muscles.
It is a popular choice in many how to train abs guides because it teaches controlled spinal movement instead of fast swinging.
This exercise is great for those who want to learn proper core control and for intermediate trainees looking to increase intensity without equipment. For beginners, you can try benting your legs while raising your hips up for an easier execution
Focus on slow movement, lifting the hips with control, and keeping your lower back supported against the floor.
Benefits
- Targets lower abs effectively
- Improves core control and coordination
- Strengthens deep abdominal muscles
- Protects the lower back when done correctly
- No equipment required
- Easy to scale for different fitness levels
- Improves body awareness and posture
Setup & Starting Position
Start by lying flat on your back on a comfortable surface like a mat or carpet.
Place your arms straight by your sides with palms pressing lightly into the floor for balance and support. Your head, shoulders, and upper back should stay relaxed on the ground.
Bend your knees and lift your feet off the floor so your thighs point upward and your knees are stacked over your hips. Keep your ankles relaxed.
Gently press your lower back into the floor by tightening your abs. This posterior pelvic tilt is important for protecting your spine.
Quick setup tip: Before starting the first rep, take a breath in and lightly brace your core as if preparing for a cough.
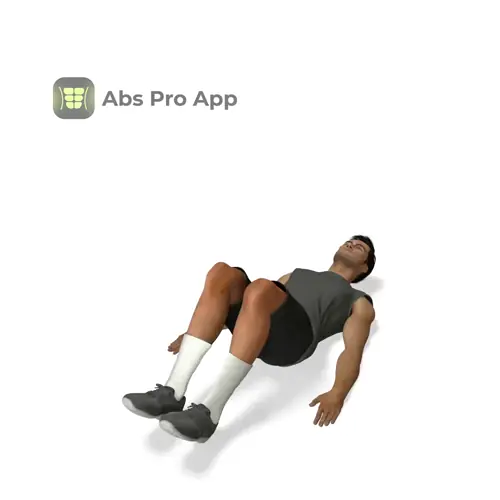
How To Do Reverse crunch with hip lift (Step-by-step)
- Lie on your back with arms by your sides and knees bent.
- Brace your core and press your lower back into the floor.
- Lift your bent legs upward until thighs are vertical.
- Straighten your legs as they move toward the ceiling.
- Use your abs to lift your hips off the floor.
- Pause briefly at the top with hips raised.
- Lower hips slowly back to the floor.
- Bend knees slightly as legs lower.
- Return to the starting position with control.
Form Cues
- Press lower back into the floor
- Lift hips, not legs only
- Move slow and controlled
- Keep neck and shoulders relaxed
- Exhale during the lift
- No swinging or momentum
Breathing & Bracing
Proper breathing makes the reverse crunch with hip lift more effective and safer.
Start each rep with a gentle inhale through your nose as you prepare. As you lift your legs and raise your hips, exhale slowly through your mouth. This helps activate the deep abs and supports spinal control.
Think about tightening your core like you are zipping up tight jeans. This is bracing, not holding your breath.
At the top of the movement, keep breathing naturally while maintaining tension. As you lower your hips and legs, take another controlled inhale.
Simple breathing rhythm: inhale to prepare, exhale to lift, inhale to lower. Repeat this pattern for every rep.
Common Mistakes
- Swinging the legs, slow down and use control.
- Using momentum, pause briefly at the top.
- Lifting the head or neck, keep them relaxed on the floor.
- Arching the lower back, press it into the floor.
- Rushing reps, slow the tempo for better results.
- Not lifting hips, focus on curling pelvis upward.
How It Should Feel
Quick self-check:
Good signs: You feel strong tension in the lower abs, your hips lift smoothly off the floor, and your lower back stays supported. You can control both the lifting and lowering phases.
Warning signs: Sharp pain, pinching in the lower back, or neck strain. Stop immediately if you feel sharp pain.
If you feel it mostly in your hip flexors, slow down and focus on pressing your lower back into the floor. If your lower back feels stressed, reduce range of motion and bend knees more.
The movement should feel challenging but controlled, not jerky or painful.
Alternative Names
reverse crunch hip lift, hip raise crunch
Variations
Easier
- Bent-Knee Reverse Crunch: Keep knees bent and skip straightening legs.
- Partial Hip Lift: Lift hips only a few inches.
- Feet Supported Reverse Crunch: Lightly tap heels to floor between reps.
Harder
- Straight-Leg Hip Lift: Keep legs straight throughout the movement.
- Slow Tempo Reverse Crunch: Use a 3 second lift and 3 second lower.
- Paused Hip Lift: Hold the top position for 2 to 3 seconds.
Sample Workout
Core-Focused Bodyweight Workout
- Reverse Crunch With Hip Lift, 3 sets of 10 to 15 reps
- High Plank, 3 sets of 30 seconds
- Dead Bug, 3 sets of 10 reps per side
- Glute Bridge, 3 sets of 15 reps
Rest 30 to 60 seconds between exercises. Perform this workout 2 to 3 times per week.
Progression Plan
Week 1: Perform 3 sets of 8 to 10 reps with bent knees. Focus on slow, controlled movement and proper breathing. Rest 60 seconds between sets.
Week 2: Increase to 10 to 12 reps per set. Begin straightening the legs slightly during the lift. Reduce rest to 45 seconds.
Week 3: Perform 12 to 15 reps with legs straighter and a 2 second pause at the top. Focus on perfect control.
If form breaks down, repeat the same week before progressing. Move to advanced variations only when you can control every rep without lower back strain.
FAQ
How to do reverse crunch with hip lift correctly?
Focus on lifting your hips, not swinging your legs, and keep your lower back pressed into the floor.
Is this exercise good for beginners?
Yes, especially with bent knees and a smaller range of motion.
How many reps should I do?
Most people do well with 10 to 15 controlled reps per set.
Can this replace regular crunches?
It can, especially if you want more lower ab activation.
Why do my hip flexors feel tired?
Slow the movement and focus on curling the pelvis upward.
Summary
The reverse crunch with hip lift is a powerful way to build core strength using only your bodyweight.
By focusing on controlled movement, proper breathing, and hip lift instead of momentum, you get more benefit with less risk.
Add this exercise to your abs routine, follow the progression, and stay consistent. Over time, you will notice better core control, improved posture, and stronger abs.
Get Defined Abs in 30 Days
This exercise is part of our complete 30-day ab program. Download the app for structured daily workouts and track your progress.