Oblique In Hold Tutorial
Benefits
- Builds strong obliques without equipment
- Improves side-to-side core stability
- Low impact on the spine when done correctly
- Teaches core bracing and breath control
- Enhances body awareness in side-lying positions
- Useful for warm-ups or focused ab training
Setup & Starting Position
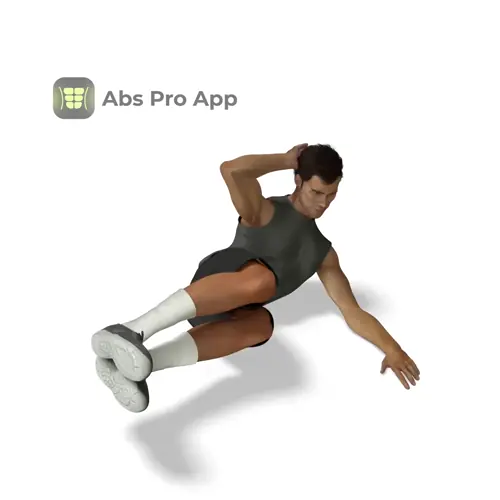
Before lifting, gently brace your core by drawing your ribs toward your hips. Keep your neck long and relaxed, eyes looking forward or slightly down. From this setup, lift your shoulders and both knees off the floor together into a side crunch position. This is your hold position.
Setup tip: If you feel unstable, adjust the bottom arm position slightly forward or back, but avoid pressing hard into the floor.
How To Do Oblique in hold (Step-by-step)
- Lie on your side with knees bent and stacked.
- Extend the bottom arm along the floor for balance.
- Place the top hand behind your head, elbow open.
- Brace your core and gently exhale.
- Lift your shoulders off the floor.
- At the same time, lift both knees together.
- Hold this oblique crunch position.
- Breathe slowly while maintaining tension.
- Keep hips stacked and neck relaxed.
- Hold for the prescribed time.
- Lower shoulders and knees with control.
- Switch sides after completing the hold.
Form Cues
- Lift shoulders and knees together
- Ribs down, abs tight
- Neck long, no pulling on the head
- Hips stacked, do not roll back
- Light balance on bottom arm
- Slow, steady breathing
Breathing & Bracing
During the hold, continue breathing in a controlled rhythm. Try a simple pattern such as a 3-second inhale through the nose and a 4-second exhale through the mouth. Avoid holding your breath, as this can increase neck tension and reduce endurance.
Think of bracing as creating tension around your midsection without flattening or arching the lower back. Your hips and ribs should stay aligned. If you feel your breathing getting shallow, slightly reduce the lift height and regain control before continuing the hold.
Common Mistakes
- Pulling on the head, fix it by keeping the elbow open and neck relaxed.
- Using the bottom arm to push, fix it by using it only for balance.
- Letting hips roll backward, fix it by stacking hips vertically.
- Holding the breath, fix it by using slow nasal breathing.
- Lifting only the shoulders or knees, fix it by lifting both together.
- Overarching the lower back, fix it by drawing ribs toward hips.
How It Should Feel
You should feel a strong, steady contraction along the side of your waist on the top side. The tension should build gradually and remain consistent during the hold. Your abs should feel engaged without sharp discomfort, and your breathing should stay controlled.
Good signs:
- Burning sensation in the obliques
- Stable hips and torso
- Neck feels relaxed
- Sharp pain in the back or hip, stop immediately
- Neck strain or headache
- Cramping that does not ease with rest
Alternative Names
Side oblique hold, Side crunch hold
Variations
Easier
- Oblique Hold with Feet on Floor: Keep knees on the floor and lift only the shoulders.
- Short Lever Oblique Hold: Keep knees bent but lift them only slightly off the floor.
Harder
- Extended Lever Oblique Hold: Straighten the legs while holding the crunch position.
- Top Elbow to Knee Hold: Lift higher to bring the top elbow closer to the knees.
Sample Workout
- High plank hold, 30 to 45 seconds
- Oblique in Hold, 20 to 40 seconds per side
- Dead bug, 8 to 10 reps per side
- Glute bridge hold, 30 seconds
Rest 45 to 60 seconds between exercises. Perform 2 to 3 rounds. Use the Oblique in Hold after dynamic core moves to challenge endurance and control.
Progression Plan
Week 1: Perform 2 to 3 sets of 20 to 25 seconds per side. Focus on clean setup, steady breathing, and keeping hips stacked. Rest 45 to 60 seconds between sets.
Week 2: Increase the hold to 30 to 35 seconds per side. Maintain the same number of sets but aim for smoother breathing and less neck tension.
Week 3: Progress to 40 seconds per side or add a third set if you started with two. Reduce rest slightly to 30 to 45 seconds.
Week 4: If you can hold 45 seconds with perfect form, try the extended lever oblique hold. If form breaks down, repeat the previous week.
Progress only when you can hold the position without losing alignment or breath control.
FAQ
How long should I hold the Oblique in Hold?
Most people start with 15 to 30 seconds per side and build up to 45 seconds with good form.
Is one hold per side considered one set?
Yes, completing the hold on both left and right sides counts as one full set.
Can I do this exercise every day?
You can, but allow rest if the obliques feel sore or fatigued.
Why do my hip flexors feel tight?
This often means you are lifting the knees too high, lower them slightly and refocus on the side abs.
Should my bottom shoulder be relaxed?
Yes, avoid shrugging it up, keep it relaxed against the floor.
Summary
Get Defined Abs in 30 Days
This exercise is part of our complete 30-day ab program. Download the app for structured daily workouts and track your progress.