Low Side Plank Hand Up Tutorial
Low Side Plank Hand Up is a forearm-based side plank where you support your body on one elbow while extending the top arm straight up. This bodyweight core exercise builds strong obliques, improves shoulder stability, and teaches full-body tension without any equipment.
It is best suited for intermediate-level trainees who already have basic plank control and want to progress their side core strength. Focus on stacked joints, long body alignment, and steady breathing. If you are searching for a clear how to do a low side plank guide or a step-by-step tutorial for side plank technique, this exercise is a staple.
Benefits
- Strengthens side abs and deep core
- Improves shoulder and hip stability
- Builds anti-rotation core control
- Enhances posture and alignment
- Trains full-body tension without equipment
- Supports better balance and coordination
Setup & Starting Position
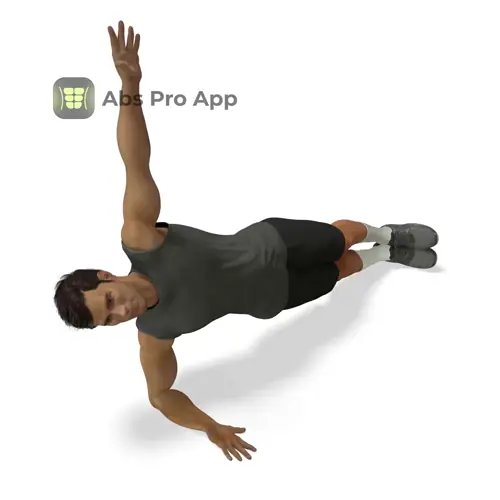
Start by lying on your side on the floor. Position your bottom elbow directly under your shoulder, with your forearm flat on the ground and pointing forward. Your shoulder, elbow, and wrist should form a straight vertical line when viewed from the front.
Straighten both legs and stack your feet on top of each other. Keep your knees extended and your ankles aligned. Your body should form one long line from the side of your head down to your heels.
Place your top arm straight up toward the ceiling, palm facing forward or inward. Keep the arm vertical and relaxed, not drifting forward or backward.
Before lifting, lightly brace your core, squeeze your glutes, and press your forearm firmly into the floor.
Quick setup tip: Imagine pushing the floor away with your elbow to create space between your shoulder and ear.
How To Do Low side plank hand up (Step-by-step)
- Lie on your side with elbow under shoulder and legs straight.
- Stack your feet and align hips, ribs, and head.
- Brace your core and squeeze your glutes.
- Press your forearm into the floor and lift your hips.
- Extend the top arm straight up toward the ceiling.
- Hold a steady position with slow, controlled breathing.
- Keep your body in a straight line without twisting.
- Maintain the hold for the planned time.
- Lower hips with control to finish the set.
Form Cues
- Elbow directly under shoulder
- Body in one straight line
- Hips stacked, not rotated
- Top arm vertical and steady
- Neck long and relaxed
- Push the floor away
Breathing & Bracing
Breathing correctly during the low side plank hand up helps you maintain control and avoid unnecessary tension. Before lifting your hips, take a calm inhale through your nose.
As you lift into the plank, gently tighten your core as if you are preparing for a light cough. This creates abdominal tension without holding your breath. Once in position, use slow, steady breaths.
A simple rhythm is to inhale for three to four seconds through the nose, then exhale for three to four seconds through the mouth. Keep your ribs down and stacked over your hips as you breathe.
Avoid shallow chest breathing or breath holding. If your breathing becomes rushed, it usually means your core tension or plank duration is too challenging. Reset, shorten the hold, and focus on controlled breathing again.
Common Mistakes
- Elbow too far from shoulder, fix by stacking joints vertically.
- Hips sagging, fix by squeezing glutes and bracing abs.
- Body twisting forward or back, fix by stacking hips and shoulders.
- Shrugged shoulder, fix by pushing the floor away.
- Top arm drifting forward, fix by reaching straight up.
- Holding breath, fix by using slow nasal breathing.
How It Should Feel
Quick Self-Check: When done correctly, you should feel steady tension along the side of your waist, especially the obliques. Your bottom shoulder should feel active but stable, not jammed. The glutes and inner thighs help support the position.
Good signs: hips stay lifted and level, breathing remains calm, and you can hold the position without shaking excessively. You feel evenly loaded from shoulder to feet.
Warning signs: sharp shoulder pain, pinching in the lower back, or numbness in the arm. Stop immediately if you feel sharp pain.
If you feel it mostly in your neck, relax your head and press the floor away. If you feel lower back strain, reset by lightly tucking the pelvis and tightening your core.
Alternative Names
forearm side plank arm up, low side plank reach up
Variations
Easier
- Low Side Plank Knees Down: Bend knees and place them on the floor to reduce load.
- Low Side Plank Hand on Hip: Keep top arm on hip instead of raised for easier balance.
Harder
- Low Side Plank with Leg Lift: Raise the top leg while keeping hips stacked.
- Low Side Plank Reach Through: Rotate the top arm under the torso and back up with control.
Sample Workout
Core Stability Workout
- Low Side Plank Hand Up, 3 sets of 20 to 40 seconds per side
- Dead Bug, 3 sets of 6 reps per side
- Glute Bridge Hold, 3 sets of 30 seconds
- High Plank Shoulder Taps, 3 sets of 10 reps per side
Rest 45 to 60 seconds between sets. Perform the side plank on both sides, where one hold per side counts as one set.
Progression Plan
Week 1: Perform 3 sets of 20 to 25 seconds per side. Focus on clean alignment, stacked hips, and steady breathing. Rest about 60 seconds between sets.
Week 2: Increase hold time to 30 to 35 seconds per side. Maintain the same strict form. If shaking increases but alignment stays solid, continue.
Week 3: Progress to 40 to 45 second holds or slightly shorten rest periods. Emphasize slower breathing and stronger glute engagement.
Week 4: Introduce an advanced variation like the leg lift for short holds of 15 to 25 seconds. If form breaks, return to the standard version.
Repeat a week if you cannot maintain stacked hips or calm breathing. Progress only when control feels solid.
FAQ
Should my feet be stacked or staggered?
Stacked feet are standard and harder. Staggering feet slightly makes balance easier.
How long should I hold the low side plank?
Most intermediate users aim for 20 to 45 seconds with perfect form.
Why is my shoulder getting tired first?
This often means your elbow position or shoulder engagement needs adjustment. Push the floor away and stack joints.
Can I do this exercise every day?
Yes, if volume is controlled and there is no joint irritation.
Summary
The low side plank hand up is a powerful way to build side core strength, shoulder stability, and full-body control using only your bodyweight. By focusing on precise setup, steady breathing, and stacked alignment, you get more benefit with less strain.
Use beginner variations when needed and progress gradually as your endurance improves. Consistent practice will translate into better posture, stronger lifts, and improved athletic performance.
Master the basics, stay patient, and let control guide your progress.
Get Defined Abs in 30 Days
This exercise is part of our complete 30-day ab program. Download the app for structured daily workouts and track your progress.