Low Plank With Hip Dips Tutorial
The low plank with hip dips is a bodyweight core exercise performed from a forearm plank while rotating the hips side to side. It is a popular abs move because it builds deep core strength, improves control through rotation, and challenges shoulder stability at the same time. This exercise is great for beginners to intermediate learning how to brace their core and for more experienced athletes who want to increase time under tension. Focus on slow, controlled movement, steady breathing, and keeping your shoulders stacked and stable as your hips dip.
Benefits
- Strengthens the entire core
- Targets the obliques through rotation
- Improves plank endurance
- Builds shoulder and upper body stability
- Enhances body control and coordination
- Supports better posture
- Can help protect the lower back when done correctly
Setup & Starting Position
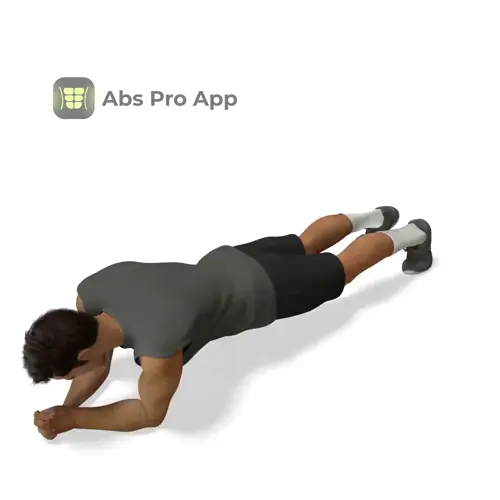
Begin on the floor and position yourself in a low plank on your forearms. Place your elbows directly under your shoulders, with forearms parallel or lightly angled inward. Your palms can rest flat on the floor or gently clasp together, whichever feels more natural. Extend your legs straight back and tuck your toes under so your body forms a straight line from head to heels.
Engage your core by gently pulling your belly button in and tightening your abs as if preparing for a cough. Squeeze your glutes and press the forearms firmly into the floor to create a stable base. Keep your neck neutral by looking down at the floor between your hands. Before starting the movement, check that your hips are level and not sagging or lifted too high.
Quick setup tip: Imagine balancing a glass of water on your lower back, this helps you find a flat, steady plank position.
How To Do Low plank with hip dips (Step-by-step)
- Start in a stable low plank on your forearms and toes
- Brace your core and tighten your glutes
- Slowly rotate your hips to the right side
- Lower the right hip toward the floor with control
- Pause briefly just before touching the ground
- Rotate back through the center to a neutral plank
- Rotate your hips to the left side
- Lower the left hip toward the floor
- Move smoothly without rushing
- Continue alternating sides for reps or time
- Finish by returning to a steady plank
Form Cues
- Elbows under shoulders
- Core tight the whole time
- Move slow and controlled
- Hips rotate, not shoulders
- Glutes squeezed
- Neck relaxed and neutral
Breathing & Bracing
Proper breathing makes a big difference in the low plank with hip dips. Start by taking a calm breath in through your nose before you move. As you rotate and dip your hips to one side, slowly exhale through your mouth. This helps your abs contract and keeps your core stable. Inhale again as you pass through the center plank position, then exhale on the next hip dip.
Focus on bracing your core without holding your breath. Think about tightening your abs as if you are zipping up a tight jacket around your waist. Your ribs should stay pulled down and your hips should stay controlled, without arching or sagging. A simple breathing rhythm you can repeat is inhale in the center, exhale as you dip. This steady pattern supports endurance and helps prevent tension in the neck and lower back.
Focus on bracing your core without holding your breath. Think about tightening your abs as if you are zipping up a tight jacket around your waist. Your ribs should stay pulled down and your hips should stay controlled, without arching or sagging. A simple breathing rhythm you can repeat is inhale in the center, exhale as you dip. This steady pattern supports endurance and helps prevent tension in the neck and lower back.
Common Mistakes
- Dropping hips too fast, slow down and control the movement
- Shoulders shifting side to side, press evenly through both forearms
- Holding the breath, use a steady inhale and exhale rhythm
- Lower back sagging, tighten abs and squeeze glutes
- Hips lifting too high, reset to a straight plank line
- Neck craning forward, look down and keep it neutral
How It Should Feel
Quick Self-Check
You should feel a strong, steady burn in your abs and obliques as you rotate side to side. Your shoulders and upper arms will feel engaged but not strained. Good signs include feeling stable through your torso, being able to move slowly, and maintaining a straight plank line between reps.
Warning signs include sharp pain in the lower back, pinching in the shoulders, or losing control and dropping into the floor. If you feel sharp pain, stop immediately and rest. If you feel the exercise mostly in your neck, relax your shoulders and focus on pressing the forearms down. If your lower back feels strained, reduce the range of motion and tighten your core more before dipping.
Alternative Names
Plank hip dips, Forearm plank hip twists
Variations
Easier
- Low plank hold, hold a steady forearm plank without rotation
- Knees-down low plank hip dips, perform the movement with knees on the floor
- Reduced range hip dips, rotate hips only halfway
Harder
- Slow tempo hip dips, add a 3 to 5 second dip each side
- Extended plank hip dips, increase time under tension to 60 seconds or more
- Feet-elevated low plank hip dips, place feet on a low step or platform
Sample Workout
You can use low plank with hip dips as part of an abs workout or a full body circuit.
Core Focus Workout
Rest 30 to 45 seconds between exercises. Focus on quality movement over speed.
Core Focus Workout
- Low plank with hip dips, 3 sets of 30 to 45 seconds
- Dead bug, 3 sets of 10 reps per side
- Bodyweight crunches, 3 sets of 15 reps
- Side plank hold, 2 sets of 20 to 30 seconds per side
Rest 30 to 45 seconds between exercises. Focus on quality movement over speed.
Progression Plan
A simple progression helps you build strength safely and consistently.
Week 1
Practice form and control. Perform 3 sets of 20 to 30 seconds of low plank with hip dips. Move slowly and keep the range of motion comfortable. Rest 45 seconds between sets. If this feels too hard, reduce the dip depth or perform the movement from the knees.
Week 2
Increase time to 30 to 45 seconds per set. Focus on smoother transitions and steady breathing. Reduce rest to 30 seconds if possible. You should feel more stable through the shoulders and core.
Week 3
Slow down the tempo by pausing one second at the bottom of each dip. Perform 3 sets of 40 to 60 seconds. Only progress if you can keep your hips controlled and your lower back neutral.
Move to advanced variations once you can hold perfect form for 60 seconds. Repeat a week if your form breaks down or breathing becomes inconsistent.
FAQ
Is low plank with hip dips good for abs?
Yes, it targets the abs and obliques while also training core stability.
How many reps should I do?
Aim for 10 to 20 controlled dips per side or work for time, such as 30 to 45 seconds.
Can beginners do this exercise?
Yes, beginners can modify by dropping the knees or limiting the range of motion.
Should my hips touch the floor?
No, lower them close to the floor without resting or collapsing.
Consult a qualified professional before performing this exercise if you have back, shoulder, or core related medical conditions.
Summary
The low plank with hip dips is a powerful way to challenge your core using only your bodyweight. By rotating with control and maintaining a strong plank position, you train strength, stability, and coordination at the same time. Keep your movements slow, your breathing steady, and your core engaged. Whether you are following a beginner guide or progressing to advanced variations, this exercise can be a reliable part of your abs routine. Stay consistent, focus on technique, and your core strength will steadily improve.
Get Defined Abs in 30 Days
This exercise is part of our complete 30-day ab program. Download the app for structured daily workouts and track your progress.