Leg Tuck And Twist Hold Tutorial
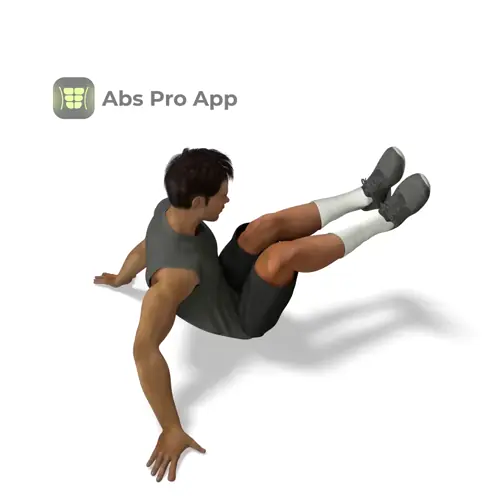
The Leg Tuck and Twist Hold is a floor-based, no-equipment core exercise that builds rotational strength and deep abdominal control. You sit on the floor with your hands supporting you, tuck your knees in, and rotate your legs and torso to one side while holding the position.
This exercise is great for beginners who want to learn how to brace their core and control rotation without fast movement. It targets the abs and obliques while also challenging balance and posture. Focus on steady breathing, a tall chest, and keeping tension through your midsection during the hold.
Benefits
- Builds core and oblique strength
- Improves rotational control
- Teaches proper core bracing
- Enhances balance and body awareness
- Low-impact and joint friendly
- Prepares you for twisting movements
- Can be done anywhere with no equipment
Setup & Starting Position
Sit on the floor with your knees bent and feet flat in front of you. Place both hands on the floor slightly behind your hips, fingers pointing forward or slightly outward, whatever feels most comfortable for your shoulders.
Lean your torso back just enough to create tension in your core while keeping your chest lifted and your spine long. Press your hands firmly into the floor for support. From here, lift both feet off the ground and tuck your knees toward your chest.
Once balanced, shift your tucked knees to one side and rotate your torso in the same direction. Your hips and shoulders should face the same side, creating a clear twist through the midsection.
Setup tip: If balance feels shaky, move your hands slightly wider apart for more stability before starting the hold.
How To Do Leg tuck and twist hold (Step-by-step)
- Sit on the floor with knees bent and hands on the ground behind you.
- Lean back slightly and brace your core.
- Lift both feet off the floor and tuck your knees in.
- Shift your knees together to one side.
- Rotate your torso toward the same side as your knees.
- Keep your chest up and spine long.
- Hold the position for the planned time.
- Breathe steadily while maintaining tension.
- Lower feet down with control.
- Switch sides if performing both sides.
Form Cues
- Chest tall, not slouched
- Knees stay tucked together
- Rotate hips and shoulders together
- Core tight the whole time
- Hands press into the floor
- Neck stays relaxed
Breathing & Bracing
Proper breathing makes this hold much more effective and comfortable. Before lifting your feet, take a calm inhale through your nose. As you lean back and tuck your knees, gently tighten your abs as if you are preparing for a cough.
During the hold, breathe slowly and evenly. Use short, controlled breaths, inhaling through the nose and exhaling through the mouth. Each exhale should reinforce your core brace, helping you stay stable without holding your breath.
Think about pulling your ribs down toward your hips while keeping your chest lifted. Your belly should feel firm but not clenched. A simple rhythm to follow is inhale for three seconds, exhale for three seconds, and repeat throughout the hold.
If you notice yourself holding your breath or shaking excessively, reset by lowering your feet, relaxing for a moment, and starting again with better control.
Common Mistakes
- Rounding the lower back, fix by lifting the chest and sitting taller.
- Letting the feet drift apart, fix by keeping knees squeezed together.
- Twisting only the legs, fix by rotating the shoulders too.
- Holding the breath, fix by using slow counted breaths.
- Leaning too far back, fix by adjusting to a more upright angle.
- Neck tension, fix by relaxing shoulders away from ears.
How It Should Feel
Quick Self-Check:
You should feel steady tension across your abs and obliques, especially on the side you are rotated toward. Your hips and torso should feel connected, not wobbly. Mild shaking is normal, especially toward the end of the hold.
Good signs:
- Warmth and engagement in the core
- Ability to breathe without losing position
- Balanced pressure through both hands
Warning signs:
- Sharp pain in the lower back or hips, stop immediately.
- Pinching in the spine, reduce the lean or end the set.
If you feel it mostly in your neck or shoulders, sit a bit more upright and press your hands more firmly into the floor. If your lower back feels strained, decrease the rotation angle or lightly tap one foot down for support.
Alternative Names
Seated leg tuck twist hold
Variations
Easier
- Feet-Assisted Leg Tuck Twist Hold: Keep one foot lightly touching the floor for balance.
- Reduced Rotation Hold: Twist only slightly to the side instead of fully.
- Short Hold Version: Hold for 5 to 10 seconds per side.
Harder
- Extended Hold: Increase hold time to 30 to 45 seconds per side.
- Hands-Off Hold: Lift one or both hands slightly off the floor to increase balance demand.
- Slow Side Switch: Transition slowly from one side to the other without lowering feet.
Sample Workout
Beginner Core Focus Workout
- Seated Knee Tucks
2 sets of 10 reps - Leg Tuck and Twist Hold
3 sets of 15 to 25 seconds per side - Dead Bug
2 sets of 8 reps per side - Glute Bridge
2 sets of 12 reps
Rest 30 to 45 seconds between sets. Use the hold as your main rotational core exercise.
Progression Plan
Week 1: Practice the basic hold with good form. Perform 3 sets of 10 to 15 seconds per side. Rest about 30 seconds between sides. Focus on smooth breathing and steady posture.
Week 2: Increase the hold to 20 to 25 seconds per side. Try to reduce how much weight you put through your hands while staying stable.
Week 3: Extend holds to 30 seconds per side or add a slow controlled side switch between reps. Keep rest short, around 20 to 30 seconds.
Week 4: Introduce advanced variations like brief hands-off holds or longer time under tension. Only progress if you can maintain form and breathing.
If form breaks down or discomfort appears, repeat the previous week and rebuild control before moving forward.
FAQ
How long should I hold the position?
Most beginners start with 10 to 20 seconds per side and build from there.
Is one hold counted per side or total?
Each side counts as its own hold, so make sure to train both sides evenly.
Can I do this exercise every day?
Yes, as long as you keep the volume moderate and focus on good form.
Why do my hip flexors feel tired?
They assist in holding the legs up, which is normal, but core tension should still be the main effort.
What if I cannot lift both feet?
Use the feet-assisted variation until your strength improves.
Summary
The Leg Tuck and Twist Hold is a simple yet effective way to strengthen your core and improve rotational control using only your bodyweight. By slowing things down and holding tension, you teach your abs how to stabilize your spine and hips together.
Stay patient, focus on quality holds, and breathe with intention. As your control improves, you will notice better balance and stronger core engagement in other exercises too. Keep practicing, switch sides evenly, and build up gradually.
Get Defined Abs in 30 Days
This exercise is part of our complete 30-day ab program. Download the app for structured daily workouts and track your progress.