Hip Lift Tutorial
Hip Lift is a focused bodyweight abs exercise where you lie on your back with your legs straight up and lift your hips off the floor using your lower abs. It is often used as a how to movement for learning lower core control without equipment.
This exercise helps build strength in the lower abs, improves pelvic control, and teaches you how to move your spine without swinging or momentum. It is great for intermediate to advanced athletes refining control. Focus on slow, controlled movement and lifting the hips, not the legs.
Benefits
- Targets lower abs effectively
- Improves pelvic control
- Strengthens core without equipment
- Low impact on joints
- Helps reduce lower back compensation
- Builds control for harder ab exercises
Setup & Starting Position
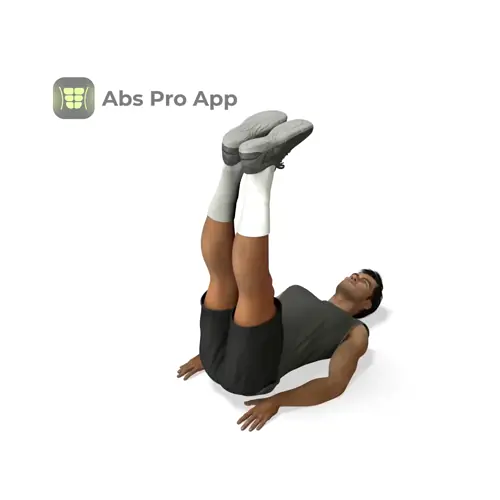
Start by lying flat on your back on a comfortable surface such as a mat or carpeted floor. Extend your legs straight up toward the ceiling so your hips are bent to about 90 degrees. Your knees should be straight but not locked.
Place your arms flat on the floor beside your body with palms facing down. Gently press your hands and upper arms into the floor to help stabilize your torso. Your head, shoulders, and upper back should stay relaxed on the ground.
Before starting the first rep, gently tuck your pelvis so your lower back is lightly pressed into the floor. This sets your core and prevents arching. Keep your neck neutral and eyes looking upward.
Quick setup tip: If your legs drift toward your face, lower them slightly so they stay stacked over your hips.
How To Do Hip lift (Step-by-step)
- Lie on your back with legs straight up and arms by your sides.
- Brace your core by gently pulling your belly in.
- Press your arms into the floor for stability.
- Slowly lift your hips a few inches off the floor.
- Think about curling your pelvis upward, not swinging your legs.
- Pause briefly at the top with control.
- Lower your hips back down slowly.
- Reset your core and repeat.
Form Cues
- Lift hips, not legs
- Move slow and controlled
- Lower back stays rounded
- Arms press into floor
- No swinging or kicking
- Neck stays relaxed
Breathing & Bracing
Proper breathing is key for getting the most out of the hip lift exercise. Before each rep, take a small inhale through your nose to prepare. As you lift your hips off the floor, slowly exhale through your mouth. This helps your lower abs engage and keeps your ribs pulled down.
Think about gently tightening your midsection like you are zipping up snug pants. This is bracing, not sucking in your stomach or holding your breath. Your breathing should stay smooth and controlled.
A simple rhythm to repeat is inhale at the bottom, exhale as you lift, then inhale again as you lower with control. If you feel pressure building in your neck or chest, reset and slow the tempo.
Common Mistakes
- Swinging legs to gain momentum, slow down and control the lift.
- Lifting too high and rolling onto shoulders, lift only a few inches.
- Arching the lower back, keep pelvis tucked.
- Bending knees unintentionally, keep legs straight but relaxed.
- Pushing with the neck or head, keep upper body relaxed.
How It Should Feel
Quick Self-Check:
You should feel strong tension in your lower abs during the lift and a controlled burn as reps add up. Your movement should feel smooth and deliberate, not jerky. The hips should lift slightly off the floor while your upper body stays grounded.
Good signs:
- Lower abs working more than thighs
- No neck or shoulder strain
- Slow, quiet reps
Warning signs:
- Sharp lower back pain, stop immediately
- Neck tension or pulling
If you feel it mostly in your lower back, reduce range of motion and focus on curling the pelvis. If your neck feels tense, relax your head and press arms into the floor.
Alternative Names
Reverse crunch, Hip raise
Variations
Easier
- Bent-Knee Hip Lift: Bend knees slightly to reduce leverage.
- Small Range Hip Lift: Lift hips just an inch or two.
Harder
- Slow Tempo Hip Lift: Take 3 seconds up and 3 seconds down.
- Paused Hip Lift: Hold the top position for 2 to 3 seconds.
Sample Workout
Lower Abs Focus Workout
- Hip Lift, 3 sets of 12 reps
- Dead Bug, 3 sets of 8 per side
- Plank, 3 sets of 30 seconds
Rest 45 to 60 seconds between sets. Focus on control rather than speed. This workout works well as a finisher or core day routine.
Progression Plan
Week 1: Perform 3 sets of 8 to 10 reps. Focus on learning the movement and keeping the lower back pressed into the floor. Rest 60 seconds between sets.
Week 2: Increase to 3 sets of 12 to 15 reps. Slow the lowering phase to 3 seconds. Keep control and avoid swinging.
Week 3: Add a 2 second pause at the top of each rep. Reduce rest to 45 seconds.
If form breaks or momentum appears, repeat the week. Move to advanced variations once you can control every rep without back strain.
FAQ
How to do hip lifts correctly?
Lift your hips by curling your pelvis, not by swinging your legs.
Is hip lift good for beginners?
Yes, it is a beginner-friendly abs exercise when done slowly.
How many reps should I do?
Start with 8 to 12 controlled reps per set.
Can hip lifts hurt lower back?
They should not, if pain occurs, reduce range or stop.
Summary
The hip lift is a simple yet powerful abs exercise that teaches proper lower core activation and control. By focusing on slow movement and lifting the hips instead of the legs, you build a strong foundation for more advanced core work.
Use it as part of your warm-up, core routine, or finisher. Stay patient, control each rep, and progress gradually. Consistent practice will improve both strength and awareness in your lower abs.
Get Defined Abs in 30 Days
This exercise is part of our complete 30-day ab program. Download the app for structured daily workouts and track your progress.