High Side Plank With Hip Dips Tutorial
High side plank with hip dips is a challenging bodyweight core exercise performed on one hand with your body turned sideways. It targets the obliques while also training shoulder stability and hip control. This move is popular in abs workouts because it combines an isometric hold with controlled movement, making it more demanding than a regular side plank.
This exercise is best suited for intermediate to advanced trainees who already have a solid plank foundation. Focus on slow, controlled hip movement, strong shoulder positioning, and keeping your body in one straight line from head to feet.
Benefits
- Builds strong and defined obliques
- Improves side-to-side core stability
- Strengthens shoulders and arms without equipment
- Enhances hip control and body awareness
- Challenges balance and coordination
- Supports better posture and spinal control
- Transfers well to sports and daily movements
Setup & Starting Position
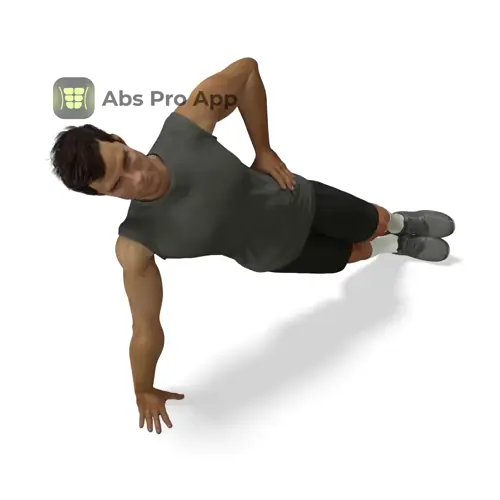
Start by lying on your side with your legs straight and stacked on top of each other. Place your bottom hand flat on the floor directly under your shoulder, fingers spread for stability. Your arm should be straight but not locked.
Stack your feet so the edges of both shoes touch the floor, or place the top foot slightly in front if you need more balance. Engage your core, squeeze your glutes, and press firmly through your hand as you lift your hips off the floor.
Your body should form a straight line from your head through your shoulders, hips, knees, and ankles. Keep your top arm resting along your side or reaching toward the ceiling.
Quick setup tip: Before starting the first rep, lightly tuck your ribs down and think about pushing the floor away with your supporting hand.
How To Do High side plank with hip dips (Step-by-step)
- Set up in a high side plank with one hand under the shoulder
- Lift hips so your body forms a straight line
- Brace your core and keep your neck neutral
- Slowly lower your hips toward the floor
- Stop just before touching the ground
- Press through your hand and lift hips back up
- Pause briefly at the top with hips fully lifted
- Repeat for the desired reps on one side
- Switch sides and repeat the set
Form Cues
- Hand stacked under shoulder
- Body in one straight line
- Move hips only, not shoulders
- Control the lowering phase
- Push the floor away
- Keep neck long and relaxed
Breathing & Bracing
Proper breathing helps you stay strong and stable during high side plank hip dips. Before you start, take a calm inhale through your nose and gently brace your core as if tightening a wide belt around your waist.
As you lower your hips, breathe in slowly while maintaining tension in your abs. When you lift your hips up, exhale through your mouth and think about pulling your ribs and hips slightly toward each other.
A simple rhythm is inhale down, exhale up. Avoid holding your breath, which can increase pressure and make balance harder. Your brace should feel firm but controlled, not rigid.
If you lose balance, reset your breath at the top position before continuing. Consistent breathing will help keep your hips level and your shoulder stable throughout the set.
Common Mistakes
- Letting the shoulder collapse, fix by pushing firmly through the hand
- Rotating the chest forward or backward, fix by stacking shoulders
- Bending at the hips instead of moving straight down, fix by keeping alignment
- Moving too fast, fix by slowing down each rep
- Neck strain from looking down, fix by keeping head in line
- Hips dropping too low, fix by stopping just above the floor
How It Should Feel
Quick self-check: You should feel strong tension along the side of your waist, especially the obliques closest to the floor. Your shoulder should feel active and stable, not painful.
Good signs:
- Burning sensation in the obliques
- Stable shoulder with no wobbling
- Controlled, smooth hip movement
Warning signs:
- Sharp shoulder or lower back pain, stop immediately
- Pinching in the neck or wrist
If you feel it mostly in your lower back, focus on bracing your abs harder and slightly squeezing your glutes. If your neck feels tense, relax your jaw and look straight ahead instead of down.
Alternative Names
side plank hip dips, side plank hip drops
Variations
Easier
- High side plank hold: Hold the top position without dipping the hips
- Knee-supported side plank dips: Bend bottom knee on the floor and perform smaller hip dips
Harder
- Slow tempo hip dips: Take 3 to 4 seconds lowering and lifting
- High side plank hip dips with reach: Reach top arm overhead to increase leverage
Sample Workout
Core and Stability Workout
- High side plank with hip dips: 3 sets of 10 reps per side
- Dead bug: 3 sets of 8 reps per side
- High plank shoulder taps: 3 sets of 20 taps
- Glute bridge hold: 3 sets of 30 seconds
Rest 45 to 60 seconds between sets. Perform all reps on one side before switching.
Progression Plan
Week 1: Perform 2 to 3 sets of 8 to 10 reps per side. Focus on perfect alignment and smooth control. Rest up to 60 seconds between sets.
Week 2: Increase to 10 to 12 reps per side and reduce rest to 45 seconds. Add a brief 1 second pause at the top of each rep.
Week 3: Slow the tempo, taking 3 seconds down and 2 seconds up. Keep reps the same but prioritize control.
Week 4: Progress to an advanced variation like slow tempo or arm reach hip dips. If form breaks down, repeat the previous week.
Move forward only when you can complete all reps with stable shoulders and level hips.
FAQ
How many reps should I do per side?
Start with 8 to 12 controlled reps per side. One rep is one full dip and lift.
Should my feet be stacked or staggered?
Stacked feet are standard. Stagger them slightly if you need more balance.
Why does my supporting shoulder get tired first?
This is normal, the shoulder works hard to stabilize. Focus on pushing the floor away.
Can I do this every day?
It is best done 2 to 4 times per week to allow recovery.
Is wrist discomfort normal?
Mild fatigue is fine, sharp pain is not. Adjust hand position or stop if pain persists.
Summary
High side plank with hip dips is a powerful abs exercise that builds strength, control, and balance using only your bodyweight. When done with proper technique, it challenges your obliques while also improving shoulder stability and overall core coordination.
Stay patient with your progress, focus on quality reps, and use regressions when needed. With consistent practice, this exercise can become a key part of your core training routine and help you move with more strength and confidence.
Get Defined Abs in 30 Days
This exercise is part of our complete 30-day ab program. Download the app for structured daily workouts and track your progress.