Hand To Foot Reach Tutorial
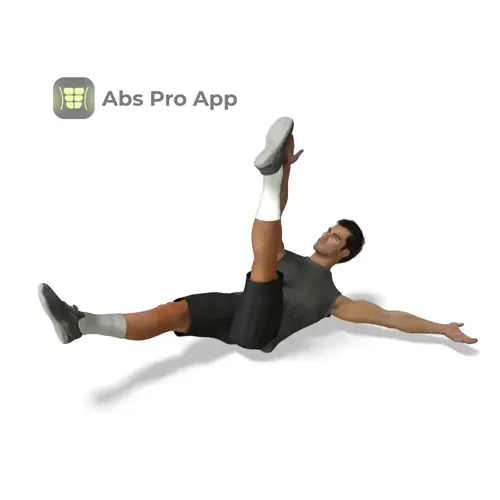
The Hand to Foot Reach is a bodyweight abs exercise performed lying on your back where you reach one hand to the opposite, lifted straight foot. It is a controlled cross-body movement that trains your core to resist twisting while producing force. This exercise is popular in abs workouts because it targets the rectus abdominis and obliques at the same time without equipment. It is best suited for intermediate trainees who already have basic core control. Focus on slow, deliberate reps, keeping your lower back stable against the floor and using your abs, not momentum, to lift and reach.
Benefits
- Builds strong, visible abdominal muscles
- Improves cross-body core coordination
- Trains core stability without equipment
- Helps reduce excessive lower back arching
- Enhances mind-muscle connection in the abs
- Fits easily into home or travel workouts
Setup & Starting Position
Lie flat on your back on the floor or a mat. Extend both legs straight and rest them lightly on the ground. Extend both arms straight overhead or along the floor so your body forms a long line from fingers to toes. Your head should rest comfortably on the floor with your neck relaxed.
Before starting, gently tuck your pelvis so your lower back makes light contact with the floor. This sets your core and prevents arching. Keep your ribs down and your abs slightly braced, as if preparing for a cough. Decide which side you will start on so you can move smoothly into the first rep without rushing.
Setup tip: If your lower back lifts off the floor during setup, bend your knees slightly, brace harder, then re-extend the legs while maintaining control.
How To Do Hand to foot reach (Step-by-step)
- Start lying flat with arms extended and both legs straight on the floor.
- Brace your core and press your lower back gently into the floor.
- Lift your right straight leg and left arm at the same time.
- Reach your left hand toward your right foot, lifting your shoulders slightly.
- Pause briefly near the top without forcing the reach.
- Lower your arm and leg back to the floor with control.
- Repeat on the opposite side, reaching right hand to left foot.
- Continue alternating sides for the desired number of reps.
Form Cues
- Keep both legs straight during each reach
- Move slow and controlled, no swinging
- Lower back stays in contact with the floor
- Reach with your abs, not your neck
- Exhale as you lift and reach
Breathing & Bracing
Proper breathing makes a big difference in this exercise. Before each rep, take a calm inhale through your nose while lying flat. As you begin to lift your arm and opposite leg, gently brace your abs, as if tightening a wide belt around your waist. Then exhale through your mouth as you reach toward your foot.
The exhale should be controlled, not forced. Think about pulling your ribs down toward your hips as you reach. This helps keep your lower back pressed into the floor and prevents overusing the hip flexors. At the top of the movement, finish your exhale, then inhale again as you lower back down.
A simple rhythm you can repeat is inhale on the floor, exhale on the reach. Never hold your breath. If you feel tension building in your neck or lower back, slow the tempo and focus on a longer, smoother exhale.
Common Mistakes
- Bending the lifted leg, fix it by lowering the range and keeping the leg straight.
- Pulling the head forward with the arm, fix it by keeping the neck long and relaxed.
- Arching the lower back, fix it by bracing harder before lifting.
- Rushing the reps, fix it by slowing down and controlling the lowering phase.
- Using momentum from the arms, fix it by initiating the lift from the abs.
How It Should Feel
You should feel a strong, focused contraction in the front of your abs with added tension along the sides of your waist during each reach. Your core should feel challenged but controlled, not shaky or loose. A mild effort in the hip flexors is normal, but they should not dominate the movement.
Good signs: steady breathing, lower back staying down, smooth alternating reps, and even tension on both sides. You should be able to stop each rep cleanly without collapsing.
Warning signs: sharp pain, especially in the lower back or hips, strong neck strain, or losing control and swinging the legs. Stop if you feel sharp pain.
If you feel it mostly in your neck, lower your head back to the floor between reps and focus on lifting the shoulders only slightly. If you feel lower back discomfort, reduce range of motion and increase bracing before lifting.
Alternative Names
Cross-body toe touch, Opposite hand to foot crunch
Variations
Easier
- Bent-Knee Hand to Foot Reach, perform the same movement but bend the lifted leg to reduce leverage.
- Single-Side Hand to Foot Reach, complete all reps on one side before switching to improve control.
Harder
- Slow Tempo Hand to Foot Reach, take 3 seconds to lift and 3 seconds to lower each rep.
- Paused Top Hand to Foot Reach, hold the top reach for 2 to 3 seconds while staying braced.
Sample Workout
Here is an example core-focused workout using this exercise:
Core Stability Circuit
Core Stability Circuit
- Hand to Foot Reach, 10 to 16 reps total, alternating sides, where one reach equals one rep
- Forearm Plank, 30 to 45 seconds
- Glute Bridge Hold, 30 seconds
Progression Plan
Use this simple progression to improve control and strength over time:
Week 1: Perform 2 to 3 sets of 8 to 10 total reps, alternating sides. Rest 45 to 60 seconds between sets. Focus on clean technique and steady breathing. If form breaks down, reduce reps and repeat the week.
Week 2: Increase to 10 to 14 total reps per set and slow the lowering phase to about 3 seconds. Maintain the same rest. Only progress if your lower back stays flat and reps feel controlled.
Week 3: Add a 2-second pause at the top of each reach or move to the slow tempo variation. Keep reps moderate and quality high.
Progress when you can complete all sets without momentum or discomfort. If control is lost, repeat the previous week before advancing.
FAQ
How many reps should I do per side?
One reach counts as one rep. Aim for equal reps on each side, such as 5 to 8 reaches per side.
Should my head stay on the floor?
Your head can lift slightly with your shoulders, but it should not be pulled forward aggressively.
Can I keep both legs lifted?
In the standard version, only one leg lifts at a time. Keeping both legs up increases difficulty and control demands.
Why do my hip flexors feel tight?
This often means your abs are not bracing enough. Slow down and focus on pressing your lower back into the floor.
If you have existing back, hip, or neck conditions, consult a qualified professional before performing this exercise.
Summary
The Hand to Foot Reach is a simple but demanding abs exercise that rewards control and focus. By reaching across your body with straight limbs, you train your core to stay stable while producing force. Keep your movements smooth, breathe with intention, and prioritize quality over speed. When performed correctly, this exercise fits perfectly into home workouts, warm-ups, or dedicated core sessions. Stay consistent, progress gradually, and let strong technique guide every rep.
Get Defined Abs in 30 Days
This exercise is part of our complete 30-day ab program. Download the app for structured daily workouts and track your progress.