Bicycle Crunch Hold Tutorial
Bicycle crunch hold is an isometric core exercise performed on your back where you hold your torso twisted toward one lifted knee. Instead of alternating reps, you pause and maintain tension, which increases time under tension for the abs.
This move strongly targets the obliques while also challenging the rectus abdominis and deep core muscles. It is best suited for intermediate trainees who already know how to control spinal position and breathing.
Focus on slow setup, steady breathing, and keeping the lifted knee slightly forward of the hip while your upper body stays rotated toward it.
Benefits
- Builds strong oblique engagement
- Improves core endurance
- Teaches anti-extension and anti-rotation control
- Low impact on joints
- Enhances mind to muscle connection
- Helps support better posture
- Transfers well to twisting movements
Setup & Starting Position
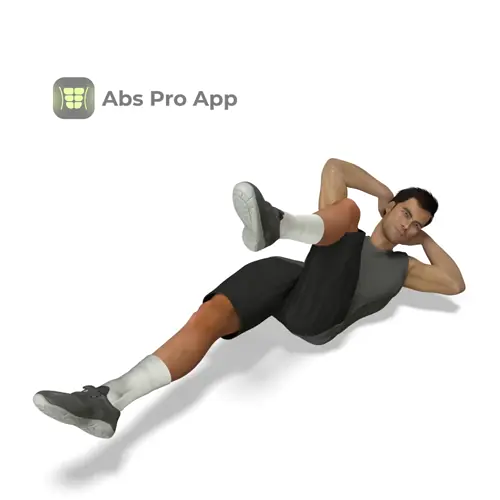
Start by lying flat on your back on the floor or mat. Bend both knees with feet planted, then gently place your hands behind your head. Your fingers should lightly support the skull, not pull the neck. Elbows stay wide and relaxed.
Lift one knee up so the thigh comes slightly forward of the hip. The opposite leg extends out and hovers just above the floor, staying straight. Flatten your lower back gently into the floor by engaging your abs.
Rotate your upper body so your chest and shoulder move toward the lifted knee. This is a controlled twist, not a crunch straight up. Your shoulder blade should come slightly off the floor.
Setup tip: Think about bringing ribs toward the hip before lifting higher, this sets core tension before the hold begins.
How To Do Bicycle crunch hold (Step-by-step)
- Lie on your back with knees bent and feet on the floor
- Place hands behind your head, elbows wide
- Lift one knee so it moves slightly past hip level
- Extend the opposite leg straight and low
- Rotate your torso toward the lifted knee
- Lift the opposite shoulder blade off the floor
- Lock in this position with steady tension
- Hold for the prescribed time while breathing
- Lower down with control
- Repeat on the other side
Form Cues
- Elbows wide, neck relaxed
- Ribs down, lower back gently pressed
- Knee slightly forward of hip
- Twist from the torso, not the neck
- Long neck, chin away from chest
- Slow and controlled breathing
Breathing & Bracing
Proper breathing is essential during the bicycle crunch hold because the goal is to maintain tension without holding your breath. Before lifting into the hold, take a calm inhale through your nose and gently brace your core as if preparing for a light cough.
Once in position, breathe slowly and steadily. Use a controlled rhythm like a 3 second inhale and 4 second exhale. As you exhale, lightly tighten your abs and imagine drawing your ribs down toward your hips. This keeps the lower back supported against the floor.
Avoid breath holding, which can increase neck tension and fatigue too quickly. If breathing becomes shallow or shaky, reduce the hold time or slightly lower the torso until control returns.
Simple rhythm: Inhale through the nose for 3 seconds, exhale through the mouth for 4 seconds, repeat for the duration of the hold.
Common Mistakes
- Pulling on the neck with the hands, fix by keeping elbows wide and hands light
- Letting the lower back arch, fix by pressing it gently into the floor
- Knee drifting too far back, fix by keeping it slightly forward of the hip
- Twisting only the neck, fix by rotating the ribs and shoulders
- Holding the breath, fix by using slow counted breathing
- Extended leg lifting too high, fix by keeping it low and straight
How It Should Feel
Quick self check: During a correct bicycle crunch hold, you should feel strong tension in the abs and especially along the side of the waist closest to the lifted knee.
Good signs:
- Deep abdominal burn that builds gradually
- Stable lower back contact with the floor
- Ability to breathe calmly while holding
Warning signs:
- Sharp pain in the neck or spine, stop immediately
- Lower back lifting off the floor
- Hip flexors taking over completely
If you feel strain in the neck, lower your head slightly and focus on rib movement rather than elbow to knee distance. If your lower back feels uncomfortable, shorten the lever by bending the extended leg or reduce the hold time.
Alternative Names
Isometric bicycle crunch, bicycle crunch pause
Variations
Easier
- Bent-leg bicycle hold: Keep the extended leg bent with foot on the floor while holding the twist
- Short hold bicycle: Hold each side for 5 to 10 seconds instead of longer durations
- Head-supported bicycle hold: Keep head lightly resting while maintaining torso rotation
Harder
- Long lever bicycle hold: Extend the non working leg lower and farther from the body
- Slow switch bicycle hold: Transition slowly between sides without resting on the floor
- Extended time hold: Increase hold duration to 30 to 45 seconds per side
Sample Workout
Core Focused Bodyweight Session
- Bicycle crunch hold, 3 sets of 20 to 30 seconds per side
- Dead bug, 3 sets of 8 reps per side
- High plank, 3 sets of 30 to 45 seconds
- Side plank, 2 sets of 20 seconds per side
Rest 30 to 45 seconds between sets. A full rep of bicycle crunch hold means completing both sides.
Progression Plan
Week 1: Start with 3 sets of 15 seconds per side. Focus on clean setup, steady breathing, and keeping the knee slightly forward of the hip. Rest 45 seconds between sets.
Week 2: Increase to 20 to 25 seconds per side. Keep the extended leg lower and straighter. Reduce rest to 30 to 40 seconds.
Week 3: Move to 30 seconds per side or add a slow switch between sides without resting fully. Maintain breathing control.
Progression tips: Progress by adding time, improving control, lowering the extended leg, or shortening rest. If form breaks or neck tension appears, repeat the current week instead of progressing.
Move to advanced variations once you can hold 30 seconds per side with calm breathing and no loss of alignment.
FAQ
How long should I hold the bicycle crunch hold?
Most people benefit from 15 to 30 seconds per side. Increase time only if form stays solid.
Is one rep one side or both sides?
One full rep consists of holding the position on both the left and right side.
Why do my hip flexors burn?
This often means the extended leg is too high. Lower it closer to the floor and refocus on abs.
Should my shoulders be fully off the floor?
Only the rotating shoulder blade needs to lift slightly. Height is less important than tension.
Can I do this exercise every day?
Yes, but keep total volume moderate and stop if recovery feels limited.
Summary
The bicycle crunch hold is a powerful way to train your core with precision and control. By removing momentum and focusing on holding tension, you build strength that carries over to athletic movement and daily stability.
Stay patient with progress, prioritize clean form, and breathe through every hold. When done correctly, this exercise rewards consistency with a stronger, more resilient core.
Get Defined Abs in 30 Days
This exercise is part of our complete 30-day ab program. Download the app for structured daily workouts and track your progress.