A-raises Hold Tutorial
A-raises hold is a prone, bodyweight isometric exercise performed face down with the chest lifted and the arms raised in an A-shape. It challenges your core, lower back, and upper back stabilizers while improving posture and shoulder control.
This exercise fits best for intermediate trainees who want better trunk stability and anti-extension strength. Focus on keeping the ribs down, glutes lightly engaged, and arms actively reaching to create tension without straining the neck.
Benefits
- Builds deep core stability
- Improves posture awareness
- Strengthens spinal extensors
- Trains shoulder control without equipment
- Supports healthier bracing patterns
- Enhances mind muscle connection
Setup & Starting Position
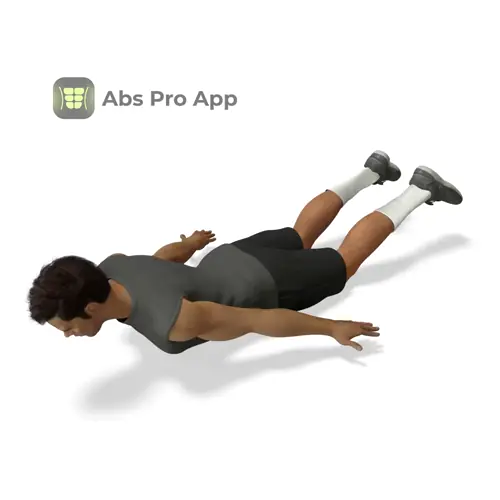
Lie flat on your stomach on the floor or a mat. Extend your legs straight back with the tops of your feet resting lightly on the ground. Keep your legs long and relaxed but not splayed, with a gentle squeeze of the glutes for pelvic support.
Place your arms slightly behind your shoulders, angled out to form an A-shape when lifted. Your palms should face down or slightly inward, with thumbs rotated up if comfortable. Let your forehead hover just above the floor so your neck stays neutral.
Before starting the hold, gently draw your ribs down toward your hips and brace your abs as if preparing for a light cough. This sets your core and prevents excessive lower back arching.
Setup tip: Think about lengthening your body from head to heels before you lift anything.
How To Do A-raises hold (Step-by-step)
- Start lying face down with legs straight and arms set in an A position.
- Brace your core gently and squeeze your glutes lightly.
- Lift your chest a few centimeters off the floor.
- Raise both arms off the floor, keeping them long and angled back.
- Hold this position while maintaining steady breathing.
- Keep your neck neutral, eyes looking down.
- Maintain tension through your abs and upper back.
- After the set time, slowly lower chest and arms back to the floor.
Form Cues
- Long neck, chin tucked slightly
- Ribs down, abs engaged
- Arms reaching back, not shrugging
- Glutes lightly on
- Small lift, not a big arch
Breathing & Bracing
Breathing during the A-raises hold should be controlled and calm. Before lifting, take a gentle inhale through your nose. As you raise your chest and arms, exhale slowly and set your brace.
Maintain tension in your abs as if you are tightening a wide belt around your waist. You should be able to breathe without losing that tension. Avoid holding your breath or flaring your ribs upward.
A simple rhythm is to inhale for three seconds, then exhale for four seconds, repeating this pattern throughout the hold. If your breathing becomes rushed or shallow, lower slightly or end the set.
Common Mistakes
- Lifting too high and over-arching the lower back, fix by reducing the lift height.
- Letting the head crane forward, fix by keeping eyes down.
- Shrugging shoulders toward ears, fix by reaching arms long.
- Holding breath, fix by using slow nasal breathing.
- Relaxed abs, fix by bracing before lifting.
How It Should Feel
Quick self-check: During the hold, you should feel steady tension across your abs, lower back, and upper back. The shoulders should feel active but not jammed.
Good signs:
- Even tension through the front and back of your core
- Ability to breathe without losing position
- Mild shaking from muscular effort
Warning signs:
- Sharp pain in the lower back, stop immediately
- Neck strain or pressure
If you feel it mostly in your neck, lower your chest slightly and lengthen the back of your head. If you feel it in your lower back, tighten your abs and glutes more and reduce the lift height.
Alternative Names
Prone A Hold, A Raise Hold
Variations
Easier
- Chest-down A hold, keep chest on floor and lift arms only.
- Short hold A-raises, hold for 5 to 10 seconds per set.
Harder
- Extended A-raises hold, increase hold time to 30 to 45 seconds.
- A-raises hold with pulses, add small controlled arm pulses while holding.
Sample Workout
Core and posture focused session:
- A-raises hold, 3 sets of 20 to 30 seconds
- Dead bug, 3 sets of 6 reps per side
- Side plank, 3 sets of 20 seconds per side
- Glute bridge, 3 sets of 10 reps
Rest 45 to 60 seconds between sets and focus on quality holds rather than long duration.
Progression Plan
Week 1: Perform 3 sets of 15 second A-raises holds, resting 45 seconds between sets. Focus on clean setup, steady breathing, and minimal lift height.
Week 2: Increase each hold to 20 to 25 seconds. Keep the same rest time and prioritize control.
Week 3: Move to 30 second holds or add one extra set. If you lose form, repeat Week 2.
Week 4: Introduce advanced variations like longer holds or light arm pulses. Progress only if breathing and core control remain solid.
Repeat a week anytime you feel excessive lower back strain or cannot maintain steady breathing.
FAQ
Should my legs be bent or straight?
Keep your legs straight with the tops of your feet lightly on the floor.
Is this exercise more for abs or back?
It trains both, with the abs stabilizing and the back muscles holding posture.
How long should I hold the position?
Most people benefit from 15 to 30 second holds with perfect form.
Can I do this every day?
Yes, if volume is moderate and form stays strict.
Summary
A-raises hold is a powerful way to train core stability, posture, and upper back strength using only your bodyweight. When done with control and proper bracing, it reinforces healthy alignment and breathing patterns.
Keep the lift small, the tension balanced, and the breath steady. Progress gradually, and use the exercise as a foundation for stronger, more resilient movement.
Get Defined Abs in 30 Days
This exercise is part of our complete 30-day ab program. Download the app for structured daily workouts and track your progress.